Form
Definition & Theory


Form, in a literal sense, is about any three-dimensional shape which can be interpreted into a variety of circumstances. For example, in the first diagram below we see multiple 3D shapes which have shadows casted onto them giving the realistic dimensional effect. Depending on the situation, different forms may give different connotations to meanings. Which then links to the photo on the right. This photo was originally of a malformed bell pepper, however when looking at it from this particular angle, it links to what a clenched fist might look like. This brings out so many connotations for what the meaning behind it is. It could be showing willpower, strength, rebellion, which all use the clenched fist as a symbol.
In reality, form itself is about how light bends around an object, and how the light is displaced by shadows which emphasises the different features said object has. It is about giving clarification, but also implicating mystery. It can mean quite so many things, as you could use literally anything. For example, taking a photo of a .359 revolver with the American flag on it will have a variety of links which could lead back to Republicanism, and America.
In reality, form itself is about how light bends around an object, and how the light is displaced by shadows which emphasises the different features said object has. It is about giving clarification, but also implicating mystery. It can mean quite so many things, as you could use literally anything. For example, taking a photo of a .359 revolver with the American flag on it will have a variety of links which could lead back to Republicanism, and America.


Image Bank AO1


AO1 Artist Research
Jason Collins Photography


Quite different compared to my normal research, Jason Collins is quite good for form as he focuses primarily on the form of vehicles and automobiles, capturing elements where there are varying shapes and tones. For example, the photo of the sports car with scissor doors has been captured in a way so the reflection can be seen, and so there are varying shadows within the photo. The fact also that the doors are open gives it a somewhat unnatural look compared to what we think a car might look like, as those and the bonnet are both raised which partially alter the shape of the car. In addition to the sports car, the black Lexus diagonal from it is a very scenic shot which places the main light source behind the subject. This makes the vehicle stand out significantly, giving a different gradient on the side and front of the car, compared to the window and roof of it. Furthermore, the background itself is a very nice area to take photos in. It seems with photographing vehicles, the area around it is just as important when capturing theme, as it is the car itself. The GTR in the top left shows this, as it is a very flashy car in a considerably run-down looking area. This car wouldn't usually be seen in this area, so maybe it connotes to the personality of the driver. The driver might be some grungy character who prefers the industrial look over the posh feeling.
AO1 Contact Sheet
All photos I have taken
---
5 Best Photos


2 Worst Photos
 ---
---
AO3 Edits
How I made my photos


Camera Settings
As per, I used my Canon EOS 1100D for taking photos. I used my main SD card, and for a small portion of photos I used my seperate macro lens to really focus on the small points of the photo. My shutter speed was around the ranges of 1/400 to 1/1000. My ISO remained around the consistent area of 400 to 1600, and my F-stop (aperture) was between F5.0 and F7.1. To conclude, the camera settings were consistent for the most part, and were all made for specifically daylight photos.
AO4 Final Piece
Final piece & Evaluation


AO1 Contact Sheet
All photos I have taken
---
5 Best Photos
2 Worst Photos
AO3 Edits
How I made my photos


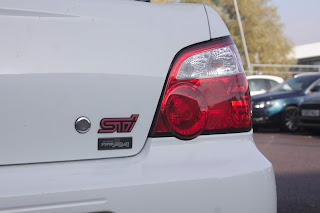
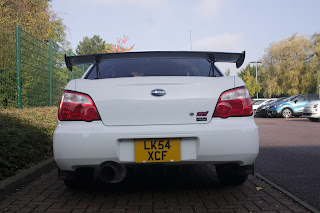
When I was improving the photos in post-production, I decided to use a burning and dodging-like technique where I erase some pieces of black and white so some areas retain colour. Beforehand, I decided it would be best to get the brightness, contrast and exposure to levels I feel would be necessary and best for the photo, and then I created a new Black/White layer. After creating I change the colour levels of the areas I won't be erasing. Finally, I used the fabled eraser and rubbed out the pieces I wanted gone. In this instance, I wanted to retain the colour in the logos and rear lights. After that's done, it makes it look quite punchy and three-dimensional. It also brings attention to points I want the reader to focus on. In this instance I was actually going to make the license plate colour as well for example, but instead I decided against it post-experimentation as it brought focus to the bottom of the car, rather than the middle-third.

Something I don't touch upon much is the history GUI. Whenever I edit my photos I always at some point end up having to undo multiple times. If I don't remember the keybinds on Mac to do that, the history tool is a very helpful tool which allows me to go back multiple times very quickly, back to an earlier state of the photo. It's also good at letting you see a before/after view of the photo.

Camera Settings
As per, I used my Canon EOS 1100D for taking photos. I used my main SD card, and for a small portion of photos I used my seperate macro lens to really focus on the small points of the photo. My shutter speed was around the ranges of 1/400 to 1/1000. My ISO remained around the consistent area of 400 to 1600, and my F-stop (aperture) was between F5.0 and F7.1. To conclude, the camera settings were consistent for the most part, and were all made for specifically daylight photos.
AO4 Final Piece
Final piece & Evaluation


contact sheet
best and worst photos
edits
camera settings
final piece and evaluation
No comments:
Post a Comment